
Inbound marketing can be tricky, especially when you're not using any software to help you. Trying to put the right content in front of the right leads at the right time becomes a guessing game. Keeping track of people's actions and your response manually would be a tedious job. Instead of using multiple softwares or just your personal Gmail account to nurture leads, try using HubSpot workflows.
Smart automation through HubSpot makes successful inbound marketing attainable. Workflows combine context with content, triggering emails and internal tasks based on a prospect's actions such as downloading an eBook, subscribing to your blog, or opening an email. Let's pump the breaks and first dive into the nitty-gritty of workflows.
What is a workflow?
"Workflow" is a marketing term that refers to an automated process where tasks, information, and emails are triggered based on set rules. Using a workflow helps reduce possible user error (Read: typos) when sending emails and following up with your leads. They also help businesses scale their marketing initiatives, instead of re-reinventing the wheel over and over again for each contact who takes the same action. Productivity and your business's reaction time will both improve. Workflows simplify the inbound lead generation and nurturing process.
There are multiple kinds of workflows and which one you should create depends on your goals and the leads you're working with. Some possible goals include your leads downloading more content, providing you with new information, or RSVP-ing for an event. The ability to segment the leads who are going to complete your workflow is a powerful option that HubSpot automation software enables.
What is HubSpot?
HubSpot is an all in one marketing automation software that relies on the inbound methodology. Due to its incredible analytical tools and user-friendly nature, HubSpot is what we do here at ManoByte. We invested our time to become the experts because all of that marketing power in one software requires a lot of studying before one can declare prowess. HubSpot is arguably one of the best marketing softwares available and it keeps improving every year, with new features and abilities.
What Makes a HubSpot Workflow so Special?
"HubSpot is the peanut butter and workflows are the jelly."
Without them both, you don't have a delicious sandwich. HubSpot allows you to create smart workflows that run behind the scenes of your day to day marketing activities. The options are seemingly endless, but here are the basics you should know before you jump into creating a workflow.
Enrolling leads can be manual, or on an on-going basis, which is helpful when you're nurturing new prospects. Instead of having to send an email to each individual who fills out a form manually, a workflow can send personalized emails with the right context and continue nurturing people based on their actions (Did they open the email, click any links, did the email bounce, etc.) Think of the time you could save by automating this process.
There are multiple types of workflows in HubSpot based on your end goals. Standard workflows are triggered when a contact in your CRM meets the starting condition(s) of the workflow. Contacts can also be entered manually with a list. Delays and actions are based on the action before it, not the lead's enrollment date.
Promoting a webinar or conference? A fixed-date workflow is best for these scenarios. The steps and rules of the process are relative to a set calendar date. If you're sending holidays marketing emails, webinar or event reminders this is a good set-up. You can even make this workflow re-occur annually, saving you time next year.
Last, contact date property workflows. Enrollment is triggered when contacts meet a certain property in their CRM record such as persona, job title, industry, birthday, etc. See something missing you want to segment your contacts by? HubSpot allows you to create custom properties for your data. An example of when this workflow would be best is sending emails to a contact on their birthday with coupons for their big day.
Creating a workflow in HubSpot keeps all of your marketing initiatives on one platform. You create the email in HubSpot, save it for automation, use a list you have created, and track it all in one place. Instead of using a bunch of cheap tools, HubSpot keeps your tasks in one place for easier tracking and analysis.
6 Steps For Building HubSpot Workflows
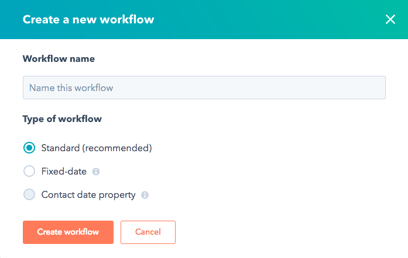
1. Identify the Type of Workflow You Need
- STANDARD: This type triggers emails whenever they meet the starting conditions of a workflow. Delays are dependent on whenever a contact is enrolled.
- FIXED: This triggers contacts whenever they meet the starting conditions of a workflow. Delays are fixed, and dependent on set a date.
- PROPERTY-BASED: This workflow requires you to select a date-type property, and any delays set in this workflow are relative to the date value listed on the contact’s record.
2. Set Your Workflow Starting Conditions
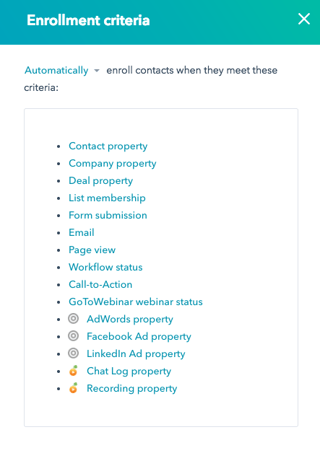
MANUAL: This option will allow you to set up your workflow to perform your desired actions and then manually enroll contacts into a workflow. Choosing this option will not enroll any contacts unless you decide to do so.
AUTOMATIC: This option will dynamically enroll contacts as they meet the criteria you set within the workflow. You’ll be prompted to decide what criteria you want your contacts to meet in order to join the workflow.
3. Analyze Your Action Points
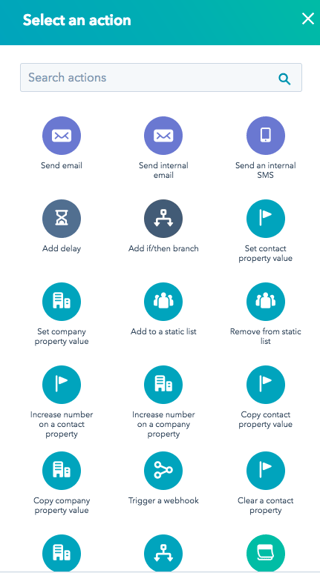
Once you have your workflow type selected, your starting conditions set, and your goal list added (when applicable), you can begin adding actions to your workflow. Actions are individual functions that execute as part of a workflow, such as sending an email, adding a delay between actions, or setting a contact property value. There are many types of actions that you can add to your workflow. Here's a quick breakdown of the main ones:
- BRANCHES: Branching logic means that you can have your contacts follow one path or another based on an action in your workflow. For example, if you send someone an email, you can have that contact receive different content depending on which option they click, A or B.
- DELAYS: In standard workflows, when a delay is added, that delay is relative to the previous action. When an action executes, the next action is scheduled. If that action is a delay, the workflow will wait the specified time before it moves onto the next action.
4. Use Advanced Workflow Settings
When planning a HubSpot workflow, you may determine that your workflow needs to be more specific, in terms of its logic and what it does and does not allow. Workflow settings can help you control your workflow’s behavior.
Some important questions to ask yourself before activating your workflow include:
- Should contacts be allowed to go through the workflow more than once?
- Should the workflow steps execute only on business days or within a certain time range?
- When a contact is enrolled in this workflow, should they be removed from any other workflows?
- Are there any contacts that you want to prevent from being enrolled in this workflow?
5. Evaluate Your Results
GOAL LISTS: A unique advantage of HubSpot’s Workflows tool is its ability to track your workflow’s performance towards a focused goal. Setting a goal list will be key to many of your workflows as you’ll be able to see at a quick glance how the workflow measures up. After your workflow has been active for some time, you will want to assess the effectiveness of your workflow.
ACTIONS: Each step will reveal a little bit more about the engagement of an action, so you can see if contacts in your workflow are opening/clicking on emails, are in a delay, or have met the workflow’s goal criteria.
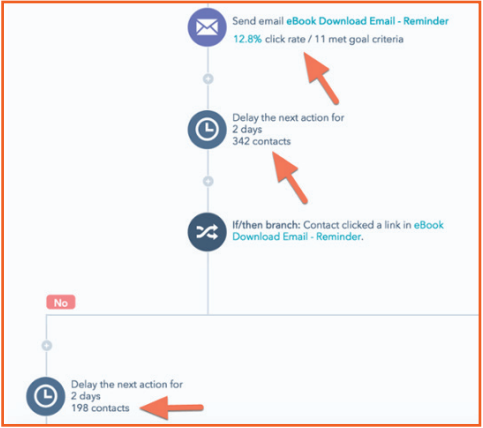
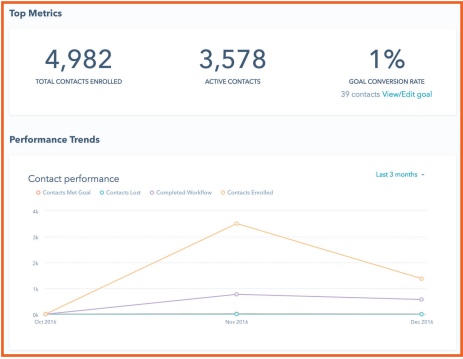
PERFORMANCE: In your left-hand navigation, you’ll find Performance. This screen displays your contact performance as well as your email performance per individual workflow. You’ll see a quick overview, first, of your workflow performance in terms of its conversion rate. Below that, you’ll see the section Performance Trends that shows a visual representation of how many contacts enrolled in your workflow, completed your workflow, were lost, and met the goal per any given time period. You can select the date filter at the top-right of this section to see a very specific time or change that to a custom date range so you can get a better idea of how the workflow has performed over an extended period.
6. Use HubSpot's Testing Tools
Before activating your workflow, you may want to test it to view the sequence of events in action. When you are testing a workflow, it actually sends your test contact through the workflow, providing you with visibility into how it functions, providing insights into any areas where you may have missed a step.
That is HubSpot Workflows, in a nutshell. Still feeling a little overwhelmed? Looking for information about setting up these processes in HubSpot? Let's chat.

